12/14/2013

Installing phpBB3 in Localhost [tuto]

 phpBB ကေတာ့ Forum ေတြမွာသုံးတဲ့ CMS တစ္မ်ဳိးပါပဲ။ phpBB ကုိ local မွာစမ္းခ်င္တယ္ဆုိရင္ လြယ္ပါတယ္။ လုိအပ္မယ့္ Tool ေတြကေတာ့ ထုံးစံအတုိင္းပဲ Windows မွာဆုိ xampp ကုိသြင္းထားျပီး httdocs မွာ phpBB package ကုိထည့္ထားေပါ့ဗ်ာ။ phpmyadmin ကေန db create ဘာညာလုပ္ပါ။ phpBB3 Download Here အရင္က localhost မွာအဲလုိမတင္ဖူးဘူးဆုိရင္ ဒီပုိ႔စ္ကုိ အရင္သြားဖတ္ေပးပါ။ :D

OK CMS တစ္ခု local မွာသြင္းရင္ လုိအပ္တဲ့ ျပင္ဆင္စရာေတြကုိ ခင္ဗ်ားအေနနဲ႔ သိျပီးျဖစ္တယ္လုိ႔ ယူဆလုိက္ပါမယ္။ ဒါဆုိရင္ Browser ကေန localhost/phpBB3 လုိ႔ေခၚလုိက္တာနဲ႔ Installation စပါျပီ။ က်န္တာကေတာ့ ခင္ဗ်ားဘာသာပဲ ဆက္လုပ္လုိ႔ရေနပါျပီ။ ေအာက္မွာ Installation ကုိ screenshot အဆင့္ဆင့္ျပထားပါတယ္။ ကြ်န္ေတာ္ ရွည္ရွည္ေျပာမေနေတာ့ပါဘူး။ ပုံေတြကုိၾကည့္ျပီး လုပ္တတ္သြားမယ္လုိ႔ ယုံၾကည္ပါတယ္။ :)

[Screenshot] step-by-step


Installation Directory ကုိမဖ်က္ရင္ full permission မရဘူးဆုိလုိ ဖ်က္ေပးလုိက္ပါ။

ဒါဆုိရင္ ရပါျပီ။ login ဝင္ျပီး စမ္းၾကည့္ေပါ့ေနာ္။ :)


Read more »

12/12/2013

Backbox Pen-testing Distro (My Review) :D

  
Ubuntu-based ျဖစ္တဲ့ Backbox Pen-testing Distro အေၾကာင္းကုိ Review ေရးၾကည့္ပါမယ္။ ကြ်န္ေတာ္ VM ကေန Live Boot တက္ျပီးစမ္းထားပါတယ္။ Ubuntu 11.04 Natty ကုိအေျခခံထားျပီး Kernel Version 2.6 ျဖစ္ပါတယ္။ ေျပာရရင္ Ubuntu ကုိ modify လုပ္ထားတဲ့ Distro တစ္ခုပါပဲ။ In my case, 11.04 ဆုိေတာ့ ေတာ္ေတာ္လည္း ေဟာင္းေနျပီလုိ႔ေျပာရမယ္။ အခု Kali Kernel version က 3.7 ျဖစ္ျပီး လက္ရွိ latest Kernel version က 3.13 ျဖစ္ေနပါျပီ။ သူ႔ရဲ႕ GUI Interface ကုိေတာ့ ဘာေျပာေျပာ ကြ်န္ေတာ္အေနနဲ႔ သေဘာက်မိပါတယ္။ Ubuntu ပရိတ္သတ္ေတြကေတာ့ ႏွစ္သက္ၾကမွာပါ။
pen-testing Tool ေတြနဲ႔ပတ္သက္ရင္ Kali မွာပါတဲ့ Top Ten Pen-testing Tool ေတြေတာ္ေတာ္မ်ားမ်ားပါဝင္ပါတယ္။ ေအာက္မွာ ကြ်န္ေတာ္ Kali ရဲ႕ Top Ten Pen-testing Tool ေတြနဲ႔ ယွဥ္ျပထားပါတယ္။ သူလည္း Kali မွာ Default အေနနဲ႔မပါတဲ့ Tool ေတြကုိထည့္ထားတာလည္း ေတြ႕ရမွာပါ။

ဒါကေတာ့ နာမည္ၾကီး Metasploit ပါ။ သင့္အေနနဲ႔ Metasploit ကုိ update လုပ္ဖုိ႔ေတာ့ လုိေကာင္းလုိအပ္ပါလိမ့္မယ္။ အျခား Kali မွာပါတဲ့ aircrack-ng လုိ Tool ေတြလည္းအမ်ားၾကီးပါဝင္ျပီးသားပါ။
Synaptic Package Manager ကုိထည့္ေပးထားလုိ႔ ခင္ဗ်ားအေနနဲ႔ ေနာက္ထပ္ Repository ေတြကုိထပ္ထည့္ျပီး သင္စိတ္ၾကိဳက္ Tool ေတြကုိ ထပ္ထည့္ႏုိင္မွာပါ။
Default Browser ကေတာ့ Mozilla Firefox (v11) ကုိထည့္သြင္းထားျပီး Internet Tab မွာ အျခား FileZilla, Thunderbird တုိ႔ကုိလည္းထည့္ထားပါေသးတယ္။
Media အတြက္ VLC Player ကုိထည့္ျပီးသားဆုိေတာ့ သင့္အေနနဲ႔ mp3, mp4 ဖုိင္ေတြကုိ ေအးေဆးၾကည့္ႏုိင္ပါလိမ့္မယ္။ Office Suite အတြက္ကေတာ့ Abiword, Gnumeric တုိ႔ကုိထည့္ေပးထားလုိ႔ Word, Excel ဖုိင္ေတြကုိ ဖြင့္ႏုိင္ပါလိမ့္မယ္။ ကြ်န္ေတာ္ထင္တယ္။ Word 2003 နဲ႔ပဲ Compatibale ျဖစ္လိမ့္မယ္။ ဒါကေတာ့ သိပ္အေရးမပါေလာက္ပါဘူး။ PDF Viewer ကုိေတာ့ Default အေနနဲ႔မေတြ႔ရပါဘူး။ ဒါေပမယ့္ Ubuntu Software Center ကေန ကုိယ္လုိခ်င္တာကုိ ထည့္လုိ႔ ရမွာပါ။
Backbox ဟာလည္း Top Ten Pen-testing Distro ထဲမွာပါဝင္ပါတယ္။ ေနာက္ဆုံး Release လုပ္တဲ့ဗားရွင္းကုိသူရဲ႕ Official Site မွာေဒါင္းႏုိင္သလုိ Distro-Witch မွာလည္းၾကည့္ႏုိင္ပါတယ္။
Backbox ကုိသင္အေနနဲ႔ live Boot လုပ္လုိ႔ရသလုိ ၾကိဳက္ႏွစ္သက္တယ္ဆုိရင္ Hard Disk မွာ အင္စေတာ့ လြယ္လြယ္ကူကူပဲ ထည့္သြင္းႏုိင္ပါလိမ့္မယ္။ Installation ပုိင္းကလည္း Ubuntu ကုိအင္စေတာ့လုပ္ဖူးတယ္ဆုိရင္ ဘာမွမခက္ပါဘူး။ ကြ်န္ေတာ္တုိ႔ ေနာက္ထပ္လုိအပ္တဲ့ Driver ေတြ၊ media Code ေတြကုိလည္း Ubuntu ကအတုိင္းပဲ respository ေတြေပါင္းျပီး မိမိလုိခ်င္တာကုိ အင္စေတာ့လုပ္ႏုိင္ပါလိမ့္မယ္။ ကြ်န္ေတာ္ကေတာ့ သြင္းပါလုိ႔ Recommended မေပးလုိပါဘူး။ ဒီဇုိင္းကုိ ၾကိဳက္မယ္ဆုိရင္ သုံးႏုိင္ပါတယ္။ ကြ်န္ေတာ္စမ္းျပတဲ့ ဗားရွင္းက 2.05 ထင္တယ္။ ထြက္တာၾကာျပီဆုိေတာ့ ေနာက္ထပ္ဗားရွင္းမွာ Tool အသစ္ေတြကုိထပ္ေပါင္းထားပါတယ္။ Kernel 3.2  ကုိသုံးထားပါသတဲ့။ ဒီေတာ့ Kali မွာအတုိင္းပဲထင္ပါတယ္။ သုံးမယ္မသုံးဘူးက ကုိယ့္ဘာသာဆုံးျဖတ္ေပါ့။ VM ကေနစမ္းၾကည့္၊ အျခား Distro ေတြနဲ႔ႏွဳိင္းၾကည့္။ စက္ေတြလည္းမပူဘူး။ သုံးလုိ႔လည္း အဆင္ေျပတယ္။ OK တယ္ဆုိသြင္းျပီးသုံး။ Kali သုံးမွ၊ BT သုံးမွမဟုတ္ပါဘူး။ ကုိယ့္ Hardware နဲ႔အဆင္ေျပေျပ Run ႏုိင္တယ္ဆုိရင္ ေကာင္းတာပါပဲ။

[Download]
Read more »

A Complete Guide to Tor: Anonymous Browsing [Tut]

ကြ်န္ေတာ္တုိ႔ အခုေခတ္မွာ အင္တာနက္အသုံးျပဳရင္ privacy ဆုိတာက အေရးပါလာပါျပီ။ ကုိယ့္စက္မွာ Virus, RAT ေတြကုိ Antivirus ေတြနဲ႔ကာကြယ္ရုံနဲ႔ မလုံေလာက္ေတာ့ပါဘူး။ ခင္ဗ်ားတုိ႔ ကြ်န္ေတာ္တုိ႔ သုံးေနတဲ့ Gmail, Facebook ဆုိတာကလည္း သင့္ရဲ႕ Data ေတြကုိ ရယူႏုိင္တယ္။ သတင္းေတြထဲမွာ NSA က အေမရိကန္ျပည္သူေတြရဲ႕ personal info ေတြကုိ Facebook, Google တုိ႔ဆီကေန ရယူဖုိ႔ဖိအားေပးေနတဲ့အေၾကာင္း ဘာညာၾကားေနရတာပဲ။ ဒီအတုိင္းဆုိ ဘယ္သူမွ အင္တာနက္မွာ မလုံျခဳံေတာ့ပါဘူး။ ခင္ဗ်ားတုိ႔ ကြ်န္ေတာ္တုိ႔ chat ကေနရုိက္သမွ် chat list ေတြကုိ တစ္ေနရာရာကေန ၾကည့္ေနတယ္။ ခင္ဗ်ားရဲ႕ IP ကအစ ခင္ဗ်ားအင္တာနက္မွာ လုပ္ခဲ့သမွ် Browsing History အဆုံးေစာင့္ၾကည့္ေနတယ္ဆုိရင္ ဒါဟာ ၾကက္သီးထစရာပါပဲ။ ကြ်န္ေတာ္တုိ႔က ျမန္မာႏုိင္ငံမွာပဲဗ်ာ။ ဒါေတြမလုိေသးပါဘူးလုိ႔ ခင္ဗ်ားေျပာခ်င္ေျပာႏုိင္ပါတယ္။ ဒါေပမယ့္ သိထားေတာ့ ပုိမေကာင္းဘူးလား။ :D

Tor ကုိအသုံးျပဳမယ္ဆုိရင္ ကြ်န္ေတာ္တုိ႔အေနနဲ႔ အင္တာနက္မွာ စိတ္ခ်လက္ခ် Browsing လုပ္လုိ႔ရပါတယ္။ သင့္ရဲ႕ browsing history ကုိလုံးဝ Trace လုိ႔မရပါဘူး။ သူ႔ရဲ႕အစြမ္းကေတာ့ Military ပုိင္းကေတာင္မွ ခင္ဗ်ားကုိ လာလုပ္လုိ႔မရပါဘူး။ ကမၻာမွာရွိတဲ့ ဘယ္အဖြဲ႔အစည္းကမွ ခင္ဗ်ားရဲ႕ Browsing Data ကုိၾကားဝင္ဖမ္းယူဖုိ႔ မစြမ္းႏုိင္ပါဘူးတဲ့။ ဒီေလာက္ဆုိ Tor ဆုိတာကုိ ခင္ဗ်ားစိတ္ဝင္စားသြားျပီမလား။

Tor ရဲ႕အရွည္ေကာက္ကေတာ့ The Onion Router ကုိယူထားတာျဖစ္ပါတယ္။ Onion routing နဲ႔သြားတာမုိ႔ source ကေနပုိ႔လုိက္တဲ့ message ဟာ destination ကုိေရာက္တဲ့အထိ ၾကားထဲမွာ အဆင့္ဆင့္ encrypt လုပ္သြားပါတယ္။ Onion routing အေၾကာင္းအေသးစိတ္ဖတ္ခ်င္ရင္ Go there  :D
ေအာက္ကပုံမွာအတုိင္း Tor client ဟာ သင့္ေတာ္မယ့္ node ကုိရွာေဖြလုိက္ပါတယ္။ Tor node ေတြကေတာ့ ကမၻာအဝွမ္း သိန္းနဲ႔ခ်ီျပီးရွိပါတယ္။ node ေတြကလည္း random ေတြျဖစ္လုိ႔ ၾကားကေနဖမ္းယူဖုိ႔ဆုိတာ ေတာ္ေတာ္ေလးခက္ခဲသြားပါမယ္။
နာက္ေတာ့ Tor client က အရင္ဆုံး node တစ္ခုဆီ encrypt လုပ္ထားတဲ့ message ကုိပုိ႔လုိက္ပါတယ္။ ဒါကုိ ပထမ node ကဖတ္ျပီး အဲဒီလုိပဲ (ပထမနည္းလုိပဲ) ေနာက္ထပ္ ဒုတိယ node ကုိထပ္သြားပါတယ္။ ဒါေၾကာင့္ ၾကားထဲမွာ encrypt လုပ္တာအၾကိမ္ၾကိမ္ျဖစ္သြားပါတယ္။ ေနာက္ဆုံး Destination ကုိမေရာက္မခ်င္းေပါ့။
ကဲ ဒီတစ္ခါေတာ့ message ကုိ လက္ခံသူကရလုိက္ျပီ။ ဒီေတာ့ သူက ေနာက္ဆုံးလက္ခံထားတဲ့ node ကေန data (encrypt လုပ္ထားတဲ့) ကုိတုိက္ဆုိင္စစ္ေဆးပါတယ္။ ဒီလုိပဲ အဲဒီ data က ဘယ္ကလာတာလဲဆုိတာကုိ ေရွ႕က node ဆီကုိထပ္သြားပါတယ္။ ကြ်န္ေတာ္ေျပာတာ ရွင္းမလားမေျပာတတ္ဘူး။ :D ေနာက္ဆုံးကေန ေနာက္ျပန္ဆုတ္ျပီး ျပန္စစ္တာပါ။ အဲဒီလုိအဆင့္ဆင့္ စစ္ေဆးျပီး ေနာက္ဆုံး sender ကေနပုိ႔တဲ့ message ျဖစ္ေၾကာင္းအတည္ျပဳျပီးမွ လက္ခံသူက message ကုိလက္ခံပါတယ္။ ဒီေတာ့ ကြ်န္ေတာ္တုိ႔ https protocol ထက္စာရင္ အမ်ားၾကီးကုိ သာလြန္တယ္ဆုိတာ သိႏုိင္ပါတယ္။ https ကေတာ့ ၾကားထဲမွာ တစ္ခါေလာက္ပဲ encrypt လုပ္တာပါ။ ခုဆုိ https ကုိ bypass ေတာင္လုပ္ႏုိင္ျပီလုိ႔ ဖတ္ေနရပါတယ္။ :)

Installing Tor
Tor ကုိအင္စေတာ့လုပ္မယ္ဆုိရင္ သက္ဆုိင္ရာ OS အလုိက္ မိမိသုံးတဲ့ os နဲ႔ကုိက္တဲ့ tor ကုိဆြဲျပီး သြင္းႏုိင္ပါတယ္။ ကြ်န္ေတာ္ကေတာ့ Windows သမားဆုိေတာ့ Windows အတြက္ https://www.torproject.org/ မွာသြားျပီး ေဒါင္းလုိက္ပါမယ္။
ေဒါင္းလုိ႔ရလာတဲ့ဖုိင္ကုိ extract လုပ္ျပီး မိမိ extract ခဲ့တဲ့ Directory မွာ Star Tor Browser.exe ကုိႏွိပ္ပါမယ္။ ဒါဆုိပုံထဲကလုိ ေတြ႕ရပါမယ္။ Connected Tor Network ျဖစ္တဲ့အထိေစာင့္ေပးေပါ့ေနာ္။
Connected ျဖစ္တာန႔ဲ Tor ဟာ သူဘာသာသူ Test page ကုိခုလုိျပျပီး အင္စေတာ့လုပ္တာေအာင္ျမင္ေၾကာင္းျပပါမယ္။ 

Google ကုိေတာင္ encrypted လုပ္ပစ္ပါတယ္။ ဒါေၾကာင့္ Google ကသင့္ဆီက Data ေတြႏွိက္ယူမွာ မပူပါနဲ႔ေတာ့။ :D

မယုံလုိ ကြ်န္ေတာ္ IP ကုိပါခုလုိစစ္ေဆးခဲ့ပါတယ္။ အဲ Tor ကေန ကြ်န္ေတာ္ဆုိဒ္က ေၾကာ္ျငာေတြကုိလည္း ကုိယ္တုိင္ကလစ္ခဲ့ပါေသးတယ္။ :D အုိင္ပီေျပာင္းသြားေတာ့ သူတုိ႔ဘန္းမွာ ေၾကာက္ရေတာ့ဘူးေလ။ ခိခိ သြားမေျပာနဲ႔ေနာ္။ :P


Ref: http://en.wikipedia.org/wiki/Tor_%28anonymity_network%29
Unofficial Guide to Tor (makeuseof)


Read more »

12/11/2013

httprecon [advance web sever fingerprinting]

Hacking Tool တစ္ခုအျဖစ္အသုံးျပဳလုိ႔ရေပမယ့္ Source code ေတြကုိပါခ်ေပးထားပါတယ္။ တကယ္လုိ႔ သင္က programmer တစ္ေယာက္ဆုိရင္ virus code ေတြပါ, မပါ စစ္ေဆးလုိ႔ရမွာပါ။ :D ဒီ tool နဲ႔ target site ကုိ ပုံထဲကလုိ scan ၾကည့္ႏုိင္ပါတယ္။ မူရင္း link နဲ႔ပဲခ်ိတ္ေပးလုိက္ပါတယ္။

Download [Here]

Read more »

Burd's proxy searcher

 
Public မွာရွိတဲ့ proxy ေတြကုိရွာေပးပါတယ္။ အင္တာနက္မွာ free proxy ရွာခ်င္တယ္ဆုိရင္ ဒီေကာင္ေလးနဲ႔ ရွာလုိက္ရုံပဲေပါ့။ Google မွာလုိက္ေမြေနစရာမလုိေတာ့ပါဘူး။ အသုံးဝင္မယ္ထင္ရင္ ယူလုိက္ေပါ့ဗ်ာ။ ေအာက္မွာ Requirement နဲ႔ Support OS ကုိလည္း ေဖာ္ျပပါတယ္။
  • Supported operation systems
    • Windows 8.1 Preview (32-bit and 64-bit)
    • Windows 8 (32-bit and 64-bit)
    • Windows 7 SP1 (32-bit and 64-bit)
    • Windows Vista SP2 (32-bit and 64-bit)
    • Windows Server 2012 R2 Preview (64-bit)
    • Windows Server 2012 (64-bit edition)
    • Windows Server 2008 R2 SP1 (64-bit)
    • Windows Server 2008 SP2 (32-bit and 64-bit)
  • RAM 1GB.
  • Internet channel at least 1Mb/s. 
 [Screenshot]
  
Read more »

Torrent Guide and How it works

 
ကြ်န္ေတာ္တုိ႔ အမ်ားစုကေတာ့ www, http, FTP စတာေတြနဲ႔ ရင္းႏွီးျပီးသားျဖစ္ပါတယ္။ အင္တာနက္ကေန ကြ်န္ေတာ္တုိ႔ File Sharing လုပ္ၾကတယ္။ ဥပမာ mediafire, zpshare, sendspace, solidfiles ဘာညာေပါ့ဗ်ာ။ ကြ်န္ေတာ္တုိ႔ ေန႔စဥ္ထိေတြ႔ေနရတယ္။ Upload လုပ္တဲ့သူေတြနဲ႔ Download နင့္ကန္ဆြဲတဲ့သူေတြနဲ႔ အဆင္ေျပေနၾကတာေပါ့။ ဒါေပမယ့္ ကြ်န္ေတာ္တုိ႔ Torrent ကေန File Sharing လုပ္တာကုိေတာ့ အသုံးျပဳတဲ့သူေတြ နည္းမယ္ထင္ပါတယ္။ ေျပာရရင္ေတာ့ Torrent ကေန ေဒါင္းလုတ္ဆြဲမယ္ဆုိ Speed ကနည္းတာလည္းပါပါတယ္။ ထားပါေတာ့။ ကြ်န္ေတာ္ေျပာခ်င္တာက Torrent အလုပ္လုပ္ပုံကုိပဲေျပာမွာဆုိေတာ့ ဆက္မယ္။ ေအာက္မွာ ကြ်န္ေတာ္တုိ႔ပုံမွန္ Download ဆြဲေနတဲ့ Network နဲ႔ Torrent Network အလုပ္လုပ္ပုံကုိ ေတြ႔ႏုိင္ပါတယ္။

ပုံထဲမွာေတြ႕တဲ့အတုိင္းပါပဲ။ ကြ်န္ေတာ္တုိ႔ေန႔စဥ္ Download ေတြနင္းကန္ဆြဲေနတယ္ဆုိတာက Normal Network ေပါ့။ File Sharing ဆာဗာတစ္ခုေပၚကေန Client ဘက္ကလူေတြေဒါင္းလုတ္ေတြဆြဲေနၾကတာေပါ့ဗ်ာ။ လူေတြအမ်ားၾကီးတျပဳိင္နက္အသုံးျပဳၾကေတာ့
ဆာဗာက မႏုိင္မနင္းျဖစ္လာျပီး Resume ေတြပ်က္က်။ အဲဒီေတာ့ ဆဲဆုိၾကနဲ႔ ဒါဟာ ကြ်န္ေတာ္တုိ႔အျမဲသုံးေနတဲ့ Normal Network တစ္ခုျဖစ္ပါတယ္။ Torrent Network က်ေတာ့ အဲလုိမဟုတ္ဘူး။ Network Topology အရဆုိရင္ သူက Point to Multipoint (Mesh Network)
လုိ႔ေျပာႏုိင္ပါတယ္။ Torrent အသုံးျပဳတဲ့လူတုိင္းဟာ Network မွာလူတုိင္း Connected ျဖစ္တယ္။ ၾကားက ဆာဗာဆုိတာက အဲဒီ Network ကုိလမ္းေၾကာင္းထိန္းေပးထားေတာ့ ပုိျပီး ေကာင္းလာတာေပါ့ဗ်ာ။ ဥပမာတစ္ခုအေနနဲ႔ ရွင္းျပရရင္ Torrent Network ထဲက လူတုိင္းမွာ စာမ်က္ႏွာတစ္ပုိင္းစီရွိၾကတယ္။ စာအုပ္တစ္ခုလုံးေတာ့ ကုိယ္စီမရွိၾကဘူး။ ေမာင္ျဖဴမွာ စာမ်က္မွာ 1 ရွိသလုိ ေမာင္လွမွာေတာ့ စာမ်က္ႏွာ 19 ရွိတယ္။ အဲသလုိေပါ့။ ဘယ္သူမွ အျပည့္မရွိဘူး။ အဲဒီေတာ့ သူတုိ႔ဟာ ကုိယ္ဖတ္ထားျပီးသားကုိ အျခားသူေတြနဲ႔လဲဖတ္လုိက္တယ္။ ကုိယ္ဆီကဖတ္ျပီးသားကုိ သူမ်ားကုိလည္းေပးရင္းနဲ႔ေပါ့။ ဒီလုိနဲ႔ လူတုိင္း စာအုပ္တစ္ခုလုံးဖတ္ျပီးသြားတဲ့အထိေပါ့ဗ်ာ။ Torrent အသုံးျပဳမယ္ဆုိရင္ ေအာက္က အေခၚေဝၚေတြကုိ အရင္ေလ့လာၾကည့္ရေအာင္။

-Torrent: torrent ဆုိတာကေတာ့ အင္မတန္မွေသးငယ္တဲ့ဖုိင္အပုိင္းအစတစ္ခုပါပဲ။ သူမွာ ဖုိင္တစ္ခုလုံးအျပည့္အဝမရွိဘူး။လူေတြအမွန္တကယ္အသုံးခ်တဲ့ဖုိင္ေတြရဲ႕အမွတ္အသားတစ္ခုသာျဖစ္တယ္။ အဲဒါကုိ Torrent Client ကေနအသုံးျပဳရပါတယ္။
-Torrent Client- ဒါကေတာ့ ကြ်န္ေတာ္တုိ႔သုံးတဲ့ End-user software လုိပဲေျပာရမလား။ ဥပမာ Bitorrent, uTorrent လုိမ်ဳိးေဆာ့ဝဲလ္ေတြျဖစ္ပါတယ္။
-Peer: torrent file တစ္ခုကုိ Download/Upload လုပ္ေနတဲ့ မည္သည့္ကြန္ပ်ဴတာကုိမဆုိ peer လုိ႔သတ္မွတ္ႏုိင္ပါတယ္။
-Seeder: Torrent Network မွာ ဖုိင္ေတြကုိ ျပီးေအာင္ upload တင္ေပးခဲ့တဲ့သူတစ္ေယာက္ပါပဲ။
-Leecher: သူကေတာ့ Torrent Network ကုိ join ထားတဲ့သူ။ Upload ျပီးေအာင္မတင္ေပးရေသးဘူး။ တနည္း Download ဆြဲေနတဲ့သူပါ။ သူလည္း download ျပီးသြားရင္ Seeder ျဖစ္လာမယ့္သူပါ။ Torrent မွာ Download ဆြဲေနခ်ိန္မွာ UPLOAD ပါ တခါတည္းတင္ေပးရတယ္။ ဒါမွလည္း torrent network ၾကီးက အသက္ဆက္ႏုိင္မွာေပါ့ဗ်ာ။
-Share Ratio: Upload/Downloadratio ပါ။ (UL/DL) ေပါ့။ ဒါေၾကာင့္ share ratio +1 လုိ႔ေျပာရင္ Upload တင္ေပးတဲ့လူဦးေရ မ်ားေနတဲ့ဆုိတဲ့သေဘာျဖစ္ျပီး ဒါဟာေကာင္းတဲ့ လကၡဏာပါပဲ။ တကယ္လုိ႔ share ratio  -1 ျဖစ္ေနရင္ေတာ့ သင့္အေနနဲ႔ အဲဒီဖုိင္ကုိမဆြဲသင့္ပါဘူး။
-Swarm: Torrent Network တစ္ခုလုံးမွာရွိတဲ့ seeder နဲ႔ leecher ေတြရဲ႕စုစုေပါင္းအေရအတြကပ္ပါပဲ။ တနည္း Torrent Network မွာရွိတဲ့ ကြန္ပ်ဴတာအားလုံးေပါ့။
-Tracker: Torrent Network မွာဘယ္သူက အဲဒီဖုိင္ကုိ လုိအပ္တယ္။ ဘယ္သူကေတာ့ အဲဒီဖုိင္ကုိ ထားေပးတယ္ဆုိတာကုိ ခ်ိတ္ဆက္ေပးတဲ့ တနည္း ပြဲစားလုိျပဳမူတဲ့ ဆာဗာပါပဲ။ တခ်ဳိ႕ Tracker ေတြက public ေပမယ့္ တခ်ဳိ႕ကေတာ့ Register လုပ္ဖုိ႔လုိအပ္ပါလိမ့္မယ္။
-Index: ဒါကေတာ့ Torrent ဖုိင္ေတြကုိ သက္ဆုိင္ရာ Category အလုိက္စီထားေပးတဲ့ ဆုိဒ္တစ္ခုလုိ႔ေျပာရင္ ရပါျပီ။ :D

Torrent Client ကုိ သင့္အေနနဲ႔ ေရြးစရာအမ်ားၾကီးထဲက တစ္ခုခုကုိေရြးျပီး အင္စေတာ့လုပ္ရုံပါပဲ။ Windows, Linux platform ေပၚမူတည္ျပီး torrent client ေတာ့ကြဲျပားသြားပါလိမ့္မယ္။ ဒီအပုိင္းကုိေတာ့ ကြ်န္ေတာ္အေနနဲ႔ အေသးစိတ္မေဖာ္ျပေတာ့ပါဘူး။ Torrent file ေတြကုိ ရွာရတာလည္း လြယ္ပါတယ္။ google မွာ ကုိယ္က Microsoft Office 2007 ကုိေဒါင္းခ်င္တယ္ဆုိရင္ Microsoft Office 2007 torrent file download ဆုိျပီးရွာရင္လည္းရပါတယ္။ ဒါမွမဟုတ္ torrent site ေတြထဲက Search ကေန ရွာရင္လည္းရပါတယ္။ ဥပမာ နာမည္ၾကီး Torrent Site ေတြကေတာ့ piratebay.ac, ဘာညာေပါ့။ နမူနာ torrent ဖုိင္တစ္ခုကုိေဒါင္းၾကည့္ရေအာင္။ http://kickass.to ကေန ဖုိင္တစ္ခုကုိ ခုလုိေဒါင္းလုိက္တယ္။
seeder 476 leecher 73 ဆုိေတာ့ မဆုိးဘူးေျပာရမယ္။ ေဒါင္းလုိက္ျပီး uTorrent ကုိဖြင့္လုိက္မယ္။ Add Torrent ကေနခုနကေဒါင္းထားတဲ့ဖုိင္ကုိေရြးေပးေပါ့ေနာ္။ ဒါဆုိ ခုလုိ torrent ကုိေဒါင္းေနတာေတြ႕ရပါမယ္။ speed ကေတာ့ IDM နဲ႔စာရင္အမ်ားၾကီးေႏွးပါတယ္။ သူက peer to peer System နဲ႔သြားတာကုိး။
Torrent site ေတြအားလုံးလည္း ေကာင္းတာမဟုတ္ပါဘူး။ သူ႕မွာ ဗုိင္းရစ္ေတြ၊ Fake torrent ေတြရွိပါတယ္။ ေဒါင္းမယ္ဆုိရင္ ခုနကေျပာသလုိ seeder ေတြမ်ားတာကုိ
ေရြးျပီးေဒါင္းေပါ့ဗ်ာ။ ႏုိင္ငံျခားမွာဆုိရင္ေတာ့ torrent site ေတြအမ်ားစုက တရားမဝင္ပါဘူး။ အဓိကကေတာ့ Music ပုိင္းဆုိင္ရာေတြအတြက္ ထိခုိက္တာကုိး။ torrent မွာ Music, Movie အဲလုိ Data ေတြရဲ႕ Resource ေတြကလည္းမ်ားပါတယ္။ ဒါေၾကာင့္ torrent ေတြကုိေဒါင္းမယ္ဆုိရင္ အဲဒီဆုိဒ္ရဲ႕ Term of Service ကုိအရင္ဖတ္ၾကည့္သင့္ပါတယ္။ ကြ်န္ေတာ္တုိ႔ျမန္မာႏုိင္ငံအေနနဲ႔ကေတာ့ အဲဒါေတြကုိ ဂရုစုိက္ဖုိ႔ သိပ္မလုိေသးပါဘူး။ :D Torrent ဖုိင္ေတြကုိ အသုံးျပဳရတာ ေတာ္ေတာ္မုိက္ပါတယ္။ ဘာလုိ႔လဲဆုိေတာ့ ကြ်န္ေတာ္တုိ႔ ရုိးရုိးရွာရင္ မရႏုိင္တဲ့ Resource ေတြ Torrent Network မွာ အမ်ားၾကီးရွိေနလုိ႔ပါပဲ။ ေနာက္မွပဲ Torrent Speed ကုိျမင့္တင္နည္းကုိ ေရးပါအုံးမယ္။


Read more »

12/10/2013

inSSIDer

Wifi Cracking လုပ္ေပးမယ့္ Tool ေတာ့မဟုတ္ပါဘူး။ ကုိယ့္အနီးနားက Wifi Network ေတြကုိပုံထဲကလုိ Scan လုပ္ေပးႏုိင္တယ္။ SSID/Channel, 2.4 GHz/5 GHz bands, 802.11a/b ဘာညာေပါ့ဗ်ာ။ Pro version ဆုိရင္ေတာ့ ဒီထက္ Function မ်ားလာမယ္သေဘာရွိပါတယ္။ :D

Download: [Here]
Read more »

Matrixux Pen-testing Distro [Review]

 
Backtrack/Kali လုိမ်ဳိး pen-testing distro တစ္ခုပါ။ Open source tool ေပါင္း 300 ေက်ာ္ပါဝင္ျပီး limit မရွိဘဲ ေနာက္ထပ္လည္း ကုိယ္စိတ္ၾကိဳက္ထည့္သြင္းႏုိင္မွာပါ။ Debian based ျဖစ္ျပီး ခုေနာက္ဆုံးဗားရွင္း ISO ကုိေဒါင္းမယ္ဆုိရင္ 3GB ေလာက္ေတာ့ဆြဲရပါလိမ့္မယ္။ သိပ္ေတာ့မကြာပါဘူးေလ။ BT/Kali တုိ႔နဲ႔။ ကြာရင္လည္း 1GB ေလာက္ေပါ့။ :D Install လုပ္စရာမလုိဘဲ Live CD/ USB အေနနဲ႔ Boot တက္လုိ႔ရပါတယ္။ Default password က toor ျဖစ္ပါတယ္။

Features (Sourcrforge.net)
  • Custom kernel 3.9.4 (patched with aufs, squashfs and xz filesystem mode, includes support for wide range of wireless drivers and hardware) Includes support for alfacard 0036NH
  • Faster interface
  • More than 340 tools powerful for penetration testing and forensics
  • New Section PCI-DSS tools in Arsenal
  • high emphasis on forensics
  • greater hardware support
  • Comes with custom installer
  • supports USB persistence
  • UI inspired from Greek Mythology
  • IPv6 tools included.
  • Easy integration with virtualbox and vmware player even in Live mode.
  • Includes latest tools introduced at Blackhat 2013 and Defcon 2013, Updated build until September 22 2013. 
Backtrack/Kali မွာပါတဲ့ နာမည္ၾကီး Metasploit, Aircrack-ng လုိမ်ဳိး Tool ေတြကုိေတာ့ Matrixux မွာပါျပီးသားျဖစ္ပါတယ္။ ေနာက္ BT/Kali မွာမပါတဲ့ Fern Wifi Cracker, subterfuge တုိ႔လုိအပုိ Tool ေပါင္းမ်ားစြာပါဝင္ထားပါတယ္။

 Kernel version 3.9 ျဖစ္ျပီး Ubuntu မွာလုိ Root access ကုိတန္းမရပါဘူး။ တစ္ခုခုဆုိ password ကုိရုိက္ေပးရပါတယ္။
အၾကိဳက္ဆုံးကေတာ့ Tor ကုိထည့္သြင္းေပးထားတာပါပဲ။ Tor ကုိေနာက္ထပ္ထည့္စရာမလုိေတာ့ဘူး။
ဒါကေတာ့ နာမည္ၾကီး Metasploit ပါပဲ။ 

Download: [Home] [Mirror]
Read more »

Jarida v1.3.2 Wordpress Themes

Wordpress ကုိသုံးတဲ့သူေတြ Theme အလန္းေလးသုံးခ်င္တယ္ဆုိရင္ ဒီ Theme ေလးကုိစမ္းၾကည့္လုိက္ပါ။ ေျပာသာေျပာရတာပါ။ Worpress အသုံးျပဳသူေတြကေတာ့ ရွားမယ္ထင္ပါရဲ႕။ :( ဘာရယ္မဟုတ္ပါဘူး။ ဆုိဒ္တစ္ခုကုိ ေၾကာ္ျငာခ်င္တာလည္းပါတာေပါ့။ ဟီး။
Demo site ကုိအရင္ၾကည့္ပါ။ ၾကိဳက္ရင္ အသုံးျပဳလုိတယ္ဆုိရင္ ယူႏုိင္ပါျပီ။ :D

Demo
Download
Read more »

12/09/2013

Load Blancing [Explaination]

ကြ်န္ေတာ္ ဒီ post မွာ Load Balancing အေၾကာင္း သိမိေခါက္မိရွိသေလာက္ နည္းနည္းေဖာ့ၾကည့္ပါရေစ။ :D Load Balancing ဆုိတာက computer, network link, CPU, Hard Disk စတာေတြကုိ စုေပါင္းျပီး parallel ပုံစံအသုံးခ်တဲ့ networking နည္းလမ္းတစ္ခုပါပဲ။ ဥပမာဗ်ာ။ Web Server တစ္ခုဆုိပါစုိ႔။ အဲဒီ web server ကုိကုိင္ေနရတဲ့ ကြန္ပ်ဴတာက သူတစ္ေယာက္တည္းဆုိ မႏုိင္မနင္းျဖစ္လာမယ္။ အဲ သူတစ္ေယာက္တည္းမဟုတ္ဘဲ အျခားအရံကြန္ပ်ဴတာေတြနဲ႔ အတူတူ load ကုိထိန္းမယ္ဆုိရင္ ေအးေဆးျဖစ္သြားတယ္ေပါ့။ Load Balancing ကုိ software အေနနဲ႔ေသာ္လည္းေကာင္း Hardware ပုံစံနဲ႔ေသာ္လည္းေကာင္း ေတြ႔ျမင္ႏုိင္ပါတယ္။ ဥပမာ DNS (Domain Name System), Multilayer Switch ေတြျဖစ္ပါတယ္။

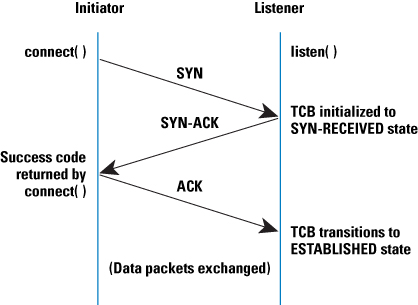
Load Balancing ကုိအသုံးခ်တဲ့အမ်ားဆုံးေနရာေတြကေတာ့ နာမည္ၾကီး website ေတြ၊ Internet Relay Chat networks, high-bandwidth File Transfer Protocol sites, Network News Transfer Protocol (NNTP) servers ေတြဘာညာေပါ့ဗ်ာ။ ဟီး။ load balancing အေၾကာင္းမေျပာခင္မွာ ကြ်န္ေတာ္တုိ႔ TCP/IP အေၾကာင္းကုိ အက်ဥ္းခ်ဳပ္ၾကည့္မယ္။ ဒါကေတာ့ ကြ်န္ေတာ္တုိ႔ webpage ေတြကုိျမင္ေနတဲ့အခါ tcp/ip အလုပ္လုပ္ပုံေပါ့ဗ်ာ။ 3 way handshake လုိ႔လူသိမ်ားပါတယ္။
ပုံထဲမွာ client ဘက္ကအရင္ဆုံး syn လုပ္ေပးတာကုိ ဆာဗာဘက္က syn/act ျပန္ပုိ႔ေပးရတယ္။ အဲဒါကုိ client ဘက္ကသိျပီး ဆာဗာဘက္ကုိျပန္ပုိ႔ အဲလုိ process ျဖစ္မွ လုပ္ငန္းတစ္ခုျပီးေျမာက္သြားတယ္။ ကြ်န္ေတာ္တုိ႔ကေတာ့ Browser ကေန http://www.google.com လုိ႔ရုိက္ထည့္လုိက္ရင္ Google ေပၚလာတယ္။ အမွန္က အေပၚကလုိ process ေတြနဲ႔သြားပါတယ္။ ဒီေတာ့ ဆာဗာကြန္ပ်ဴတာဟာ ဘယ္ေလာက္ေတာင္အလုပ္ရွဳပ္မလဲဆုိတာ သိႏုိင္ပါတယ္။ အဲဒီ ဆာဗာေတြဆုိတာ အခ်ိန္ျပည့္စကၠန္႔နဲ႔အမွ်အလုပ္လုပ္ေနရတဲ့အျပင္ သူဆီကုိ request လာလုပ္တဲ့ Data ေတြကလည္းတစ္ခ်ိန္တည္းမွာ request ေပါင္းေထာင္ေသာင္းခ်ီပါတယ္။ ဟုတ္တယ္ေလ။ ကြ်န္ေတာ္တုိ႔ ရွာခ်င္တာရွာေနတဲ့ Google ဆုိတာကုိ ကြ်န္ေတာ္တစ္ေယာက္တည္းၾကည့္ေနတာမဟုတ္ပါဘူး။ ျမန္မာႏုိင္ငံတစ္ခုတည္းသုံးေနတာလည္းမဟုတ္ဘူး။ ဒီေတာ့ သူ႔ခမွ်ာ ဘယ္ေလာက္ေတာင္အလုပ္ရွဳပ္ေနမလဲဆုိတာ စာနာတတ္ရင္ ကုိယ္ခ်င္းစာလုိ႔ရေနပါျပီ။ :D ဒီၾကားထဲ အျမင္ကပ္ပုဒ္မနဲ႔ DDoS Attack လုပ္ခံရရင္ေသျပီ။ ယခုလက္ရွိ request က တစ္စကၠန္႔မွာ request ေပါင္း 1 ေသာင္းရွိတယ္ဆုိပါစုိ႔။ DDoS Attack ခံရရင္ ဒီထက္ဆယ္ဆမကဆုိလည္း ျဖစ္ႏုိင္တာပဲ။ ဒီေတာ့ အဲဒီဆုိဒ္ဟာ Offline ျဖစ္သြာဖုိ႔ပဲရွိေတာ့တယ္။ ကဲ ဒါဆုိ ဘယ္လုိလုပ္ၾကမလဲ။ အဟမ္း ကြ်န္ေတာ္ေဖာ့ခ်င္တဲ့ load balancing ကဒီေနရာမွာ ပါလာျပီေပါ့ဗ်ာ။ ဟီး :D ကြ်န္ေတာ္ cmd ကေန google ကုိ ping လုိက္တယ္ဗ်ာ။

Microsoft Windows [Version 6.1.7600]
Copyright © 2009 Microsoft Corporation. All rights reserved.
C:\Users\Lotus Black>ping http://www.google.com
Pinging http://www.google.com [74.125.135.103] with 32 bytes of data:
Reply from 74.125.135.103: bytes=32 time=1682ms TTL=44
Reply from 74.125.135.103: bytes=32 time=1557ms TTL=44
Reply from 74.125.135.103: bytes=32 time=1744ms TTL=44
Reply from 74.125.135.103: bytes=32 time=1496ms TTL=44
Ping statistics for 74.125.135.103:
Packets: Sent = 4, Received = 4, Lost = 0 (0% loss),
Approximate round trip times in milli-seconds:
Minimum = 1496ms, Maximum = 1744ms, Average = 1619ms


ကြ်န္ေတာ္ဆီမွာ ကြန္က ရလုိက္မရလုိက္ျဖစ္ေနတာနဲ႔ ေနာက္တစ္ခါ ping လုိက္ပါတယ္။ ပုိေသခ်ာသြားေအာင္။ :D

Microsoft Windows [Version 6.1.7600]
Copyright © 2009 Microsoft Corporation. All rights reserved.
C:\Users\Lotus Black>ping http://www.google.com
Pinging http://www.google.com [172.194.126.84] with 32 bytes of data:
Reply from 172.194.126.84: bytes=32 time=1682ms TTL=44
Reply from 172.194.126.84: bytes=32 time=1557ms TTL=44
Reply from 172.194.126.84: bytes=32 time=1744ms TTL=44
Reply from 172.194.126.84: bytes=32 time=1496ms TTL=44
Ping statistics for 172.194.126.84:
Packets: Sent = 4, Received = 4, Lost = 0 (0% loss),
Approximate round trip times in milli-seconds:
Minimum = 1496ms, Maximum = 1744ms, Average = 1619ms


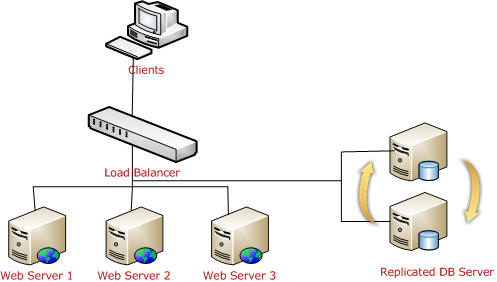
အဲဒါကေတာ့ Google ရဲ႕ DNS server ကေန reply ျပန္တဲ့ IP Address ပါခင္ဗ်။ သတိထားမလားမသိဘူး။ IP Address ကတစ္ခုနဲ႔တစ္ခုမတူပါဘူး။ ပုံမွန္ဆုိဒ္ေတြဆုိရင္ IP Address ကမ်ားေသာအားျဖင့္ အေသပါ။ Google ကေတာ့ အဲလုိပဲေျပာင္းေနမွာျဖစ္ပါတယ္။ အဲဒီ IP Address ကုိ Browser မွာ http://172.194.126.84 ဆုိျပီးေခၚၾကည့္ပါ။ Google က်လာပါမယ္။ ဒီလုိပဲ http://74.125.135.103 ဆုိရင္လည္း ထုိနည္းလည္းေကာင္းပါပဲ။ အဲဒါကေတာ့ ကြ်န္ေတာ္အေနနဲ႔ ဥပမာတစ္ခုကုိေပးၾကည့္တာပါ။ ကြ်န္ေတာ္တုိ႔ ေခၚလုိက္တာကေတာ့ http://www.google.com ဆုိတဲ့ domain name တစ္ခုပါပဲ။ ေနာက္ကြယ္မွာက်ေတာ့ Domain Name ကုိ Resolve လုပ္ေပးတဲ့ IP ေတြကေျပာင္းသြားပါတယ္။ ေအာက္ကပုံကုိၾကည့္လုိက္ရင္ သူအလုပ္လုပ္ပုံကုိ နားလည္သြားမွာပါ။


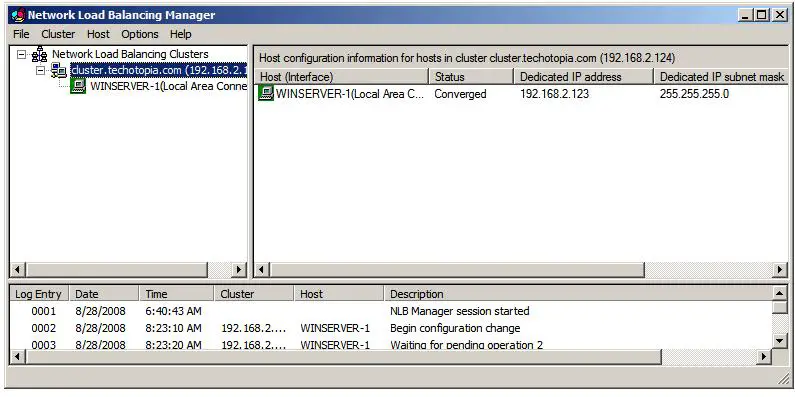
Software ပုိင္းနဲ႔ပတ္သက္ျပီး အထဲမွာ ဘယ္လုိလုပ္တာလဲ နည္းနည္းထပ္သြားၾကည့္မယ္ဗ်ာ။ ဒီအပုိင္းကုိေတာ့ Windows Server ကုိကုိင္ဖူးတယ္ဆုိရင္ နားလည္လြယ္မွာပါ။ အဲဒီ Load Balancing အတြက္ Windows Server မွာ အဲဒီ Function ပါပါတယ္။ ဥပမာ ဒီလုိေလးေပါ့။

one.google.com A 74.125.135.103.1
two.google.com A 172.194.126.84.2
http://www.google.com NS one.google.com
http://www.google.com NS two.google.com


ဒါကေတာ့ Windows Server ရဲ႕ A Record မွာ Configure လုပ္ထားတဲ့ Setting တစ္ခုလု႔ိေျပာႏုိင္ပါတယ္။ A Record ထဲက server 1 အတြက္ IP 74.125.135.103 ျဖစ္ေနခ်ိန္မွာ Zone file မွာရွိတဲ့ အရံ server 2 မွာလည္း IP 172.194.126.84 နဲ႔ Standby ျပင္ထားတယ္။ တစ္ခုမအားခ်ိန္မွာ ဒါမွမဟုတ္ ေဒါင္းေနခ်ိန္မွာ server 2 ကအလုပ္လုပ္ပါတယ္။ ဒါကေတာ့ Windows Server 2008 မွာရွိတဲ့ Configuration နမူနာပါ။
ဒီလုိနည္းနဲ႔ Google ဟာအသက္ရွင္ေနတာျဖစ္ပါတယ္။ သူ႔ဆီက ဆာဗာေတြအတြက္ Power Consumption က ျမဳိ႕ငယ္တစ္ခုကုိ မီးေပးလုိ႔ရတယ္လုိ႔ ဖတ္ခဲ့ဖူးပါတယ္။ ဒါေၾကာင့္ Google အေနနဲ႔ Software ပုိင္းသာမက Hardware ပုိင္းနဲ႔ပတ္သက္တဲ့ Load Balancer ေတြလည္းသုံးမွာမလြဲပါဘူး။ Cisco Linksys Load Balancer ကုိခုလုိေတြ႕ႏုိင္ပါတယ္။

Load Balancer ကဘာေတြလုပ္ေပးႏုိင္မွာလဲ??
Hardware နဲ႔ Software load balancer ဆုိျပီးကြဲတဲ့အေလ်ာက္ Function ေတြကေတာ့ အကုန္တူမွာမဟုတ္ပါဘူး။ ဒါေပမယ့္ အမ်ားဆုံး Common ျဖစ္တာေတြကေတာ့ ေအာက္ပါအတုိင္းျဖစ္ပါတယ္။ သူရဲ႕ Function အျပည့္စုံကုိေတာ့ မေဖာ္ျပေတာ့ပါဘူး။ ပုိ႔စ္ရွည္ေနမွာစုိးလုိ႔။ အေသးစိတ္ကေတာ့ ကုိယ့္ဘာသာ ရွာဖတ္လုိက္ပါေတာ့။ ဟီး။

-Asymmetric load
-Priority activation
-Distributed Denial of Service (DDoS) attack protection
-HTTP compression
-TCP offload
-TCP buffering
-HTTP security
-Intrusion prevention system

ေနာက္ထပ္ရွိေသးတယ္ဗ်။ biggrin ဒီေလာက္ဆုိရင္ ဘာေျပာေျပာ Load Balancing အေၾကာင္း တီးမိေခါက္မိရွိသြားမယ္လုိ႔ ေမ်ာ္လင့္ပါတယ္။ လုိအပ္တာရွိသြားရင္ ကြ်န္ေတာ္ရဲ႕ညံ့ဖ်င္းမွဳသာျဖစ္ပါလိမ့္မယ္။

Ref: http://en.wikipedia.org/wiki/Load_balanc...mputing%29

http://www.4sectors.com/forum/showthread.php?tid=1302
Read more »